Tuesday, 18 September 2018

Growing, harvesting and storing Edamame (soya) beans

If anything at the plot has loved the long hot summer it has been the soya beans. They originate from Asia and can be seen on the menu of many thai and sushi restaurants in the UK. Their popularity over the last few years has increased and many supermarkets sell fresh and frozen, shelled and unshelled Edamame beans.

I love them, the kids love them, everyone loves them! They're a superb source of protein and also calcium, so for a dairy free (almost) household we eat a lot of them. When I took on the allotment I knew I wanted to grow them. Not because it would save us money... because I've never seen how they grow and I wanted to get them in the ground.

How to Grow Edamame (soya) Beans
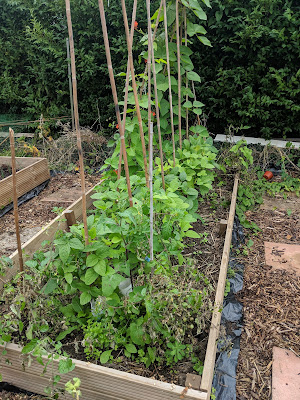
Edamame need a long growing season. The need to be started off indoors at the end of May, hardened off and then planted out in July. Their growing position needs to be full sun in moist, well draining soil with plenty of nutrients. Very similar to runner beans. They do climb but some are self supporting, I put mine around canes just to help lighten their load when fruiting. Space them around 30 cm apart as they can get quite bushy and can grow up to 1m tall.

They seem to be very slow growing but will burst into life around August with tiny white flowers where the seed pods will form. The pods grow in large bunches hidden under the leaves so you may not notice them until you get up close and look for them!

How to Harvest Edamame (soya) beans
As the pods start to swell they'll need feeding to ensure good growth of the beans. I used a diluted seaweed extract once a week through August and the beginning of September to help them along.

The harvesting period of Edamame is very short indeed, ideally with the whole crop harvested in one go. You want to get them before the leaves of the main plant start to yellow and when the pods are still bright green and firm. They'll need inspection every few days in the run up to harvesting to ensure they're picked at their prime. Yellowing pods and leaves signal that their nutrients are diminishing so you want to pick them before they get to this stage.

To harvest, simply cut the whole stem off at ground level, find somewhere comfortable to sit and pluck the green pods off. Cut up and compost the leaves and stems. Leave the roots in the ground for a few weeks to add extra nitrogen back to the soil.

How to eat or store Edamame (soya) beans
Once the beautiful green pods have been picked, you'll want to either eat them or store them. They will keep in a refrigerator for up to a week after being harvested but are always best when fresh.

The beans HAVE TO BE COOKED before consumption so don't be tempted to eat them like peas. At least 10 minutes boiling time will get rid of any toxins in the beans. They can be boiled in their pods and them popped out and straight into your mouth as a snack. A little salt and dried chilli is a delicious addition. Just don't eat the outer pod!

If you'd like to store them, they freeze well as long as they're blanched first. Add the whole pods to boiling salted water and cook for 1 minute. remove from the heat and immerse immediately in ice water to stop them cooking further. Now you can freeze them in the pods as they are OR you can shell them, spread them on a baking tray and freeze. Freezing on a tray stops them clumping together. Once they're frozen put them in a Tupperware box with a lid. They'll keep for at least 6 months, but they never last that long in our house!

Have you grown soya beans this year? How was your harvest?


Friday, 14 September 2018

What I'm going to be planting outdoors SEPTEMBER 2018

September is a funny month for planting new seeds. Most of the summer crops are coming to an end so there's spaces popping up here and there when the summer plants are spent. I'll be digging up a few more beds in the next few weeks once the cabbages, runner beans, edamame and sweetcorn are all finished. This will leave me with a bit of space that should ideally be filled with some quick crops and also some over wintering crops too.

Here's a list of what I'm going to be planting outside this month:

Rocket - Wild Trizia
Beetroot - Rote Kugel 2
Radish - Scarlet Globe
Pak Choi - red and green mix
Radish - Mooli Longipinnatus
Lettuce - winter imperial

And for all the areas that will  lay dormant over the winter, I'll be sowing a green manure, probably phacelia. This will grow through the Autumn and then be dug in to the soil in January, or whenever the ground isn't too frozen.

I'm also using this month to organise my seeds and make a plan for next year.


Thursday, 13 September 2018

What's attacking my leeks?

A few weeks ago I shared a picture of how well my Musselburgh leeks were doing. They were planted in rows in a raised bed, alongside some minipop sweetcorn plants. I had bought them as young plants, put them in at the end of July and they seemed to be doing really well. At least I thought they were doing well anyways.

I noticed a few days ago that the leaves were looking a little beaten up and just assumed that the sudden cold weather and heavy rain may have played a part. (silly me, never assume anything without taking a closer look!)

Today I got a chance to take a look at them and to my horror, there were tiny caterpillars happily munching away at my baby leeks. I whipped my phone out and started furiously googling what could have caused it. Because this is my first time growing leeks, I had no idea about the types of bugs that could infest them so good old Google came to the rescue. I knew all about leek rust but this didn't look like it, and I realised I knew nothing about something called Leek moths.

My search brought me to something called the leek moth. Read the whole RHS factsheet here.
I can be forgiven for missing the leek moth as the adults only grow to around 6mm long, so teeny tiny. They lay eggs on the young leek plants at the beginning of summer and these become caterpillars. But there's a double whammy, these moths produce two generations over a summer so there's another fresh batch of eggs come late summer after the first generation of caterpillars have pupated and laid another load of eggs. So if you don't catch them first time around, you'll definitely see them second time as these ones do some serious damage to the now maturing plants.

The brownish-white caterpillars are small, around 11mm long and feed on the outer leaves of the leeks. Once they've had their fill they move towards the inside of the leek and basically eat it from the inside. Pretty devastating for a crop as even though the caterpillars don't eat the entire plant, the damage they do causes secondary rotting and the leeks will wither away due to the extensive damage.

But all is not lost!

You can gain the upper hand by searching out the caterpillars and destroying them. On a commercial scale this is totally unfeasible but with my 30 odd plants I was willing to give it a go. I put on my rubber gardening gloves and began carefully opening up the leeks leaf by leaf to find the little blighters. They tend to hide really deep in the crevices of the leeks so I did an experiment to see if I could get them out without causing too much damage to the plant.

I mixed some fairy dish liquid and water in a spray bottle and sprayed each leek from directly above, so that the outer and inner leaves fill with soapy water. To my surprise, after a few minutes, the caterpillars all started to make their way up the stems and on to the outer leaves, trying to escape from a soapy doom. I was there, ready for them, with my scissors! I simply snipped them in  half as I found them.

I know it seems cruel but there is no way I'm letting them ruin a crop I was really excited to be growing!

I'll go back either tomorrow or on the weekend for another look and hope that I've got rid of the majority of them.

Have you had problems with your leeks this year? How do you protect your crop from such invaders?

Friday, 7 September 2018

A summer of success

I'm coming back to report on my first spring & summer season at the plot.
I took it on back last October (2017) when the ground was solid and the weeds were as high as I am tall.
It seemed like a mammoth task but we've managed it. This year has been a difficult one, for novice and experienced gardeners the weather surprised everyone and the long hot weeks of May and June made for difficult growing conditions.
We've learnt an awful lot during our first few months and it's been a steep learning curve. We've had some real failures but also some amazing successes. I'll list what went well and what went wrong a little later. First, let me show you some photographs of how the plot is looking.


 We are very lucky that we got a regular delivery of shredded wood chips and leaves to lay down on the paths. It's not recommended to be used as a mulch as the potential for it to contain chemicals is unknown so we just use it for the paths and they look really neat. The raised beds are all made from either single or double planks of decking boards - a really easy a cheap(ish) way of doing it.

We're currently using the original soil from the plot as filler for the beds as it seemed pretty good at the beginning of the year. We soon came to realise it's infested with bindweed. So next season we're going to go for the no-dig technique in a bid to eradicate the bindweed. Because the plot was neglected for some time before we took it on, the whole thing is just covered with weeds poking out at every opportunity. Back in the spring, I came home from the plot one evening close to tears as a fresh rainfall and a bit of sun had brought every weed imaginable to the surface and I felt totally deflated. Gladly, we seem to be keeping on top of the worst offenders but it's a daily job keeping them at bay.

Now on to our successes and failures for spring and summer 2018.


Crops that were failures : 

  • broad beans - decimated by black fly
  • early radish and beetroot - ran to seed because of the sun and were decimated by slugs
  • iceberg lettuce - looked ready then bolted into magnificent lettuce trees in the heat
  • moneymaker tomatoes - produced about 6 tomatoes
  • runner beans - the first lot died a death in the sun, around 30 plants in total despite being planted into a trench of manure
  • mangetout - grew to about 6 inches tall, flowered, produced 2 or 3 pods on each plant and then died
  • sugarsnaps - did the same as above
  • turnips - out of 12 planted, only 2 grew to a havestable size
  • pak-choi - bolted very quickly, though we did have 5 or 6 decent pickings
  • carrots - out of 2 packets of seeds only 5 made it to planthood
  • rocket - bolted by ridiculous proportions
  • kale - the unkillable plant? yeah, we killed it!
  • spinach - bolted and went to seed
  • raspberry canes - bought 15 canes from Suttons seeds and only 1 made it in the heat.
  • spring onions - didn't bother to grow at all!
Crops that were a success : 
  • Brussels sprouts - the first plants to go in the ground on the plot as are now impressive Brussels trees with sprouts growing and being harvested
  • onions - i grew shallots, turbo and another variety which were all very successful, not huge bulbs but good taste
  • cabbages - these have turned into magnificent plants and are producing some delicious heads
  • butternut squash - I was gifted two young plants and they took up around 6 foot square each and have produced some very delicious squashes.
  • second sowing of beetroot - ended up with enough to eat and enough to pickle.
  • second sowing of radishes - not many of these made it home as they were delicious
  • second sowing of runner beans (from nursery grown plants) - bought "enorma" plants from Rocket Gardens and they have flourished!
  • babycorn - again, purchased from Rocket Gardens as young plants. Not harvested any yet but they are looking wonderful
  • leeks - musselburgh variety doing very well in a bed, around 35 plants in total
  • cherry tomatoes -  the plants were wild and unruly but we have picked a lot!
  • chillis - 5 different varieties
  • herbs - mainly parsley, thyme, oregano, rosemary, mint, basil, chives, fennel
  • edamame
  • strawberries
There are a lot of things still in the ground, either still growing or getting ready for overwintering. 
It's been a fabulous year so far and I'd hate to imagine how much money we've spent on tools and plants etc, but the joy it has brought me has no price. It's been amazing!

Now to get the seeds ready for next year to do it all again!


Growing, harvesting and storing Edamame (soya) beans

If anything at the plot has loved the long hot summer it has been the soya beans. They originate from Asia and can be seen on the menu of ...